4 wheel alignment done after fitting the lift kit,brake calliper,drums,speaker grills and new brake lines painted,interior cleaned out and led lights fitted in the foot wells and under rear seats and ****ed about trying to tart the damaged silver trim inside.
You are using an out of date browser. It may not display this or other websites correctly.
You should upgrade or use an alternative browser.
You should upgrade or use an alternative browser.
What have you done to your Freelander today
- Thread starter Freelaner
- Start date
This site contains affiliate links for which LandyZone may be compensated if you make a purchase.
kernowsvenski
Well-Known Member
- Posts
- 1,472
- Location
- Truro
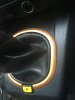
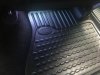
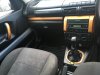
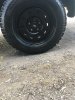
Lookin' goooood4 wheel alignment done after fitting the lift kit,brake calliper,drums,speaker grills and new brake lines painted,interior cleaned out and led lights fitted in the foot wells and under rear seats and ****ed about trying to tart the damaged silver trim inside.
Finished off the trim and hardwired the footwell lights in and had a try at the Center caps.Excuse the seats it has been a work horse for the last 3 years need a good steam clean and a wet vac,failing that burning.4 wheel alignment done after fitting the lift kit,brake calliper,drums,speaker grills and new brake lines painted,interior cleaned out and led lights fitted in the foot wells and under rear seats and ****ed about trying to tart the damaged silver trim inside.
Attachments
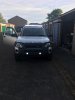
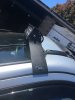
Done the wiring harnesses for the pod lights and light bar ran the wires just need to make some brackets tomorrow to hold the light bar in place.Only thing I’m not to sure about is the position of the light bar,should I go across the top of the windscreen or on the bit between the windscreen and sunroof?
Attachments

Nodge68
Well-Known Member
- Posts
- 32,504
- Location
- Near Newquay
Only thing I’m not to sure about is the position of the light bar,should I go across the top of the windscreen or on the bit between the windscreen and sunroof
You want the LED bar further back as LED light is very diffused. This diffusion will light up any dirt or damage at the top of the windscreen glass. This will be very distracting at night, which is the time you'll be using the light. So really you'll need to position the bar back far enough that the roof casts a shadow over top of windscreen. Do some tests after dark so you can get an idea of the exact mounting position.
The other way round it is to move the bar forward of the screen top. I think this looks rubbish and in the fog or rain, will illuminate the water drops, again giving a bright close up dazzling effect.
Wish I seen this earlier,just finished it I went forward of the windscreen not so much you can’t see it from inside I will try it out in rain see what it’s like,will just have to make some more brackets if it’s to bad .But this is the finish article for now.You want the LED bar further back as LED light is very diffused. This diffusion will light up any dirt or damage at the top of the windscreen glass. This will be very distracting at night, which is the time you'll be using the light. So really you'll need to position the bar back far enough that the roof casts a shadow over top of windscreen. Do some tests after dark so you can get an idea of the exact mounting position.
The other way round it is to move the bar forward of the screen top. I think this looks rubbish and in the fog or rain, will illuminate the water drops, again giving a bright close up dazzling effect.
Attachments

Rank Amatuer
Well-Known Member
- Posts
- 4,531
- Location
- Scotland
Tried to pin down that 'clunk' coming from the rear suspension whenever I encounter potholes. Everything seems tight to me, so I must be doing something wrong. Just how do you test the droplinks and anti-rollbar bushes? Do I need to compress the springs to take the load off the bushes?
Alibro
Well-Known Member
- Posts
- 7,024
- Location
- Northern Ireland
I check drop links while the car is on it's wheels. If you jack it up make sure both wheels are off the ground at the same time.Tried to pin down that 'clunk' coming from the rear suspension whenever I encounter potholes. Everything seems tight to me, so I must be doing something wrong. Just how do you test the droplinks and anti-rollbar bushes? Do I need to compress the springs to take the load off the bushes?
tonytherunner
Active Member
- Posts
- 339
- Location
- wherever the road takes me
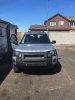
Front lamp guards and a frame protection bar installed ")
Last edited:
kernowsvenski
Well-Known Member
- Posts
- 1,472
- Location
- Truro
The rear end clunk could be a failed trailing link front bush.Tried to pin down that 'clunk' coming from the rear suspension whenever I encounter potholes. Everything seems tight to me, so I must be doing something wrong. Just how do you test the droplinks and anti-rollbar bushes? Do I need to compress the springs to take the load off the bushes?
Diesel Do
Well-Known Member
- Posts
- 5,212
- Location
- Nottingham
pardec
Active Member
- Posts
- 993
- Location
- South Manchester- North Devon
pardec
Active Member
- Posts
- 993
- Location
- South Manchester- North Devon
Paulindre
Active Member
- Posts
- 117
- Location
- Le Blanc,dep 36,France
I thought you might like this so I have copied it across from the crankshaft breather thread ........I check drop links while the car is on it's wheels. If you jack it up make sure both wheels are off the ground at the same time.
"This seems like an old thread but someone may read it. Can you guess what this is?"
warm regards from France
Paul
BTW they also chucked away the plastic centering clip, I am glad I don't need it.
Paulindre
Active Member
- Posts
- 117
- Location
- Le Blanc,dep 36,France
You want the LED bar further back as LED light is very diffused. This diffusion will light up any dirt or damage at the top of the windscreen glass. This will be very distracting at night, which is the time you'll be using the light. So really you'll need to position the bar back far enough that the roof casts a shadow over top of windscreen. Do some tests after dark so you can get an idea of the exact mounting position.
The other way round it is to move the bar forward of the screen top. I think this looks rubbish and in the fog or rain, will illuminate the water drops, again giving a bright close up dazzling effect.
Forward mounted top lights are a lot of fun in snow as well, you will have to wear a pair SUPERGALACTIC PERIL GLASSES, you know, the ones that turn black when they sense danger to stop you from panicing.
" from the hitch hikers guide to the Galaxy"
Nodge68
Well-Known Member
- Posts
- 32,504
- Location
- Near Newquay
I love HHGTTG. I saw the radio show live when they did a tour in 2012. It was brilliant and would love to get a copy of the show, if it exists." from the hitch hikers guide to the Galaxy"
Paulindre
Active Member
- Posts
- 117
- Location
- Le Blanc,dep 36,France
I love HHGTTG. I saw the radio show live when they did a tour in 2012. It was brilliant and would love to get a copy of the show, if it exists.
There you go Nodge
Nodge68
Well-Known Member
- Posts
- 32,504
- Location
- Near Newquay
There you go Nodge
I've got the full TV series on DVDs and without the subtitles.
I loved it when I was a kid and still love it now.
Paulindre
Active Member
- Posts
- 117
- Location
- Le Blanc,dep 36,France
Youtube have loadsI've got the full TV series on DVDs and without the subtitles.
I loved it when I was a kid and still love it now.
Youtube have all sorts of different formats for HHG, Audio book, radio and tv shows and other bits and piecesI've got the full TV series on DVDs and without the subtitles.
I loved it when I was a kid and still love it now.
Paul
Nodge68
Well-Known Member
- Posts
- 32,504
- Location
- Near Newquay
I'm an avid YouTube user so I'll check some HHG stuff out on there too.Youtube have loads
Youtube have all sorts of different formats for HHG, Audio book, radio and tv shows and other bits and pieces
Paul
Cheers.
Similar threads
- Replies
- 15
- Views
- 523
- Replies
- 11
- Views
- 486