stretchie_
Active Member
- Posts
- 476
- Location
- Gloucester
Hi guys, I have seen a few threads about removing the clock in a Disco 1 but never with pics, and these still leave people confused.
I'm not sure if I have seen them on this forum or another so I'll post it anyway and hopefully it will be usefull to someone.
It would be nice to know if this is the same for a Disco 2 (before and after facelift, the only LandRover I have been in is my Disco and a new 90 I took for a very short test drive because I felt like it)
It's sooo easy and all you need is a credit type card, to be honest, it's much easier with two and preferably a smooth card with no embossed numbers..
1. Here is your dash, see the clock on one side and the coin tray in the other, it's the same to remove these on both sides

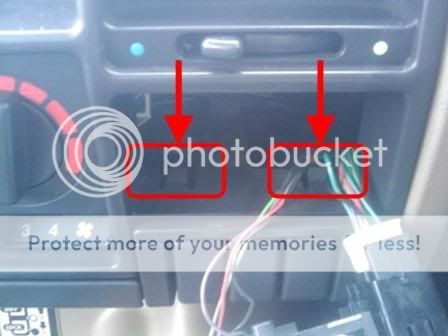
2. Just for your info and to make these easier so you know what you are aiming for, these are the tabs you are trying to displace to allow you to remove the clock. There are two on the bottom and two in the same position at the top
3. Insert the first card, corner first underneath the clock. Keep pushing and feel around to make sure you push out the clip

4. Now straighten the card out and push further in so it is square

5. Repeat at the top

6. Slide left and right (or even put the card in longways to ensure both clips have been pushed)

7. Now all the clips have been released pull both the cards and the clock should slide out

Sorted
I'm not sure if I have seen them on this forum or another so I'll post it anyway and hopefully it will be usefull to someone.
It would be nice to know if this is the same for a Disco 2 (before and after facelift, the only LandRover I have been in is my Disco and a new 90 I took for a very short test drive because I felt like it)
It's sooo easy and all you need is a credit type card, to be honest, it's much easier with two and preferably a smooth card with no embossed numbers..
1. Here is your dash, see the clock on one side and the coin tray in the other, it's the same to remove these on both sides
2. Just for your info and to make these easier so you know what you are aiming for, these are the tabs you are trying to displace to allow you to remove the clock. There are two on the bottom and two in the same position at the top
3. Insert the first card, corner first underneath the clock. Keep pushing and feel around to make sure you push out the clip
4. Now straighten the card out and push further in so it is square
5. Repeat at the top
6. Slide left and right (or even put the card in longways to ensure both clips have been pushed)
7. Now all the clips have been released pull both the cards and the clock should slide out
Sorted
Last edited:
")