Discovery Rust - Boot, Sills and Wings

This site contains affiliate links for which LandyZone may be compensated if you make a purchase.

GreenHornet

Well-Known Member
Posts
1,361
Location
Fleet, Hampshire
Hello Everyone,

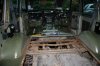
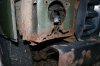
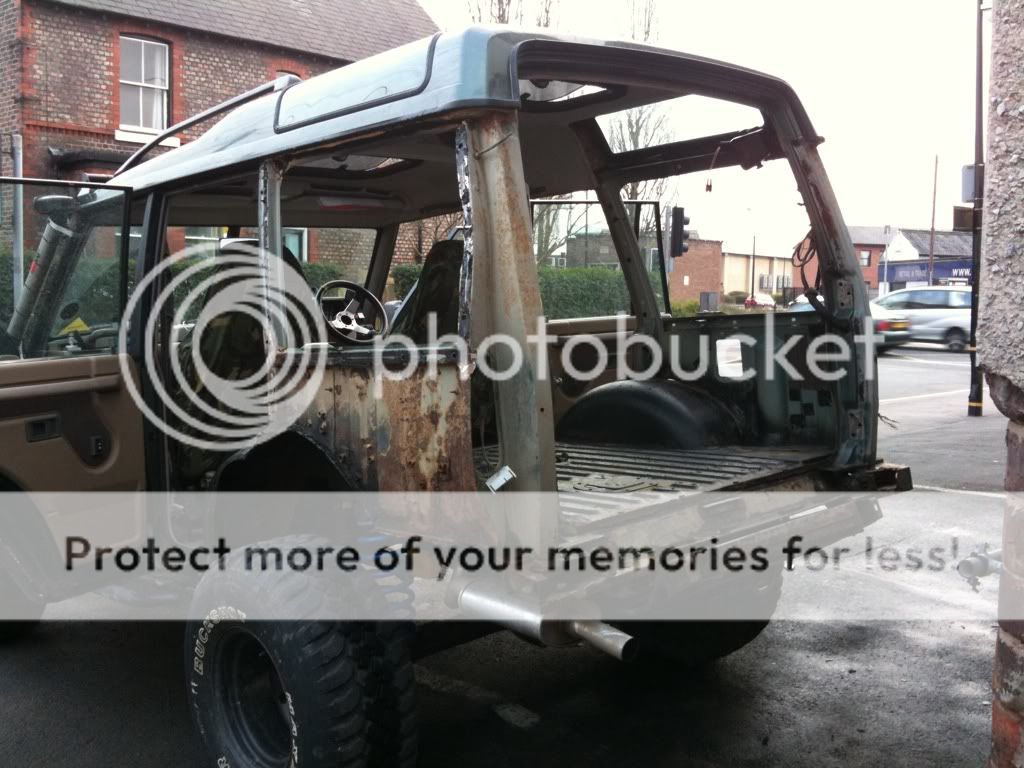
Back in April I purchased the Green Hornet, a three door 200TDi with only 113k on the clock. Now it looked pretty straight and had an MOT until this December so I thought she would be a good base for an off roader etc.

She has been sat in the drive for the last 3 months since the tax ran out and i intended to see to the little bit of rust before the next MOT was due.

Well I finally got the chance to have a look over the bank holiday and this is the start of the story which has well and truly unfolded.

Hopefully I can help all the potential Disco owners to check before buying and give some encouragement to owners who have work to do to their own vehicles.

So if your sitting comfortably I will Begin

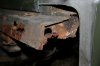
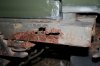
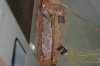
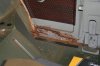
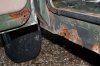
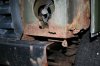
The attached photo is of the rear offside. I thought that this would be a easy repair and that as the crossmember didn't need replacing I was quids in. So far so good.

(Please forgive me I have never uploaded photo before)
 

Attachments

  • IMG_3768 (640x427).jpg
    IMG_3768 (640x427).jpg
    40 KB · Views: 6,159
  • IMG_3767 (640x427).jpg
    IMG_3767 (640x427).jpg
    46.6 KB · Views: 10,184
Good luck. I've been doing loads of welding to mine for the past...... Hummm........ MONTHS!!

Bloody things. Good luck trying to repair the crossmember. I tried to but junked it in the end and got a new panel. So far I have done inner and outer sill, boot floor side panels and rear inner quarter panels, chassis sections, rear inner arch and rear outer arch. Still got drivers side to sort!!
 
I noticed that both the rear body mounts need replacing so will pick these up as individual items and then plate the rusty areas.

Secondly I thought that I should have a look at the boot floor. I spent a few hours and drilled out the spot welds ( I recommend a spot weld drill) I didn;t have a proper drill bit and struggled. My stubbourness knows no bounds!!

This is waht greeted me.

Now at this point I was thinking to myself that I really didn't want to strip out the little bit of rear carpet around the arches and the in the rear footwell, but I thought that it may get damaged so I would make the effort.

MISTAKE
 

Attachments

  • IMG_3765 (800x533).jpg
    IMG_3765 (800x533).jpg
    77.5 KB · Views: 5,347
  • IMG_3766 (800x533).jpg
    IMG_3766 (800x533).jpg
    76.1 KB · Views: 4,614
As you can see the floor has gone completely in front of both arches and yes, that is the groun you can see:eek:
 

Attachments

  • IMG_3770 (640x427).jpg
    IMG_3770 (640x427).jpg
    51.5 KB · Views: 4,676
  • IMG_3771 (640x427).jpg
    IMG_3771 (640x427).jpg
    50.9 KB · Views: 4,650
So next I thought 'In for a Penny' so out came the seats and the centre console and the front carpets.

Look what greeted me on the passenger footwell
 

Attachments

  • IMG_3772 (640x427).jpg
    IMG_3772 (640x427).jpg
    55.8 KB · Views: 8,090
Finally I went for broke and out came the lights, off came the wings and now I have inner wings to do both sides as well as the sills.

BUGGER
 

Attachments

  • IMG_3778 (640x427).jpg
    IMG_3778 (640x427).jpg
    48.2 KB · Views: 4,914
  • IMG_3780 (640x427).jpg
    IMG_3780 (640x427).jpg
    49.4 KB · Views: 4,526
  • IMG_3781 (640x427).jpg
    IMG_3781 (640x427).jpg
    56.6 KB · Views: 4,888
  • IMG_3782 (640x427).jpg
    IMG_3782 (640x427).jpg
    56.7 KB · Views: 4,523
  • IMG_3784 (640x427).jpg
    IMG_3784 (640x427).jpg
    63 KB · Views: 5,002
In total she needs the following;
  1. Boot Floor
  2. Rear Cross Member Repair
  3. Rear Body Mounts
  4. Inner Sill Patch to Both Sides In Front Of Arches
  5. Both Exterior Sills
  6. Patch To Front Footwell
  7. Both Inner Wings
  8. Both Light Boxes
  9. Both Forward Body Mounts

I am still entusiastic as i think despite the work she is still worth keeping, after all I will weld it all myself however i could have saved myself time and effort by following simple rules;
  1. Don't View Car In Dark
  2. Get Dirty and Look Underneath
  3. Lift up Boot Carpet
  4. Check under inner wings
  5. Don't belive an MOT

The interior is now taking up my garage and the saga will continue.........
 

Attachments

  • IMG_3785 (640x427).jpg
    IMG_3785 (640x427).jpg
    51.2 KB · Views: 2,831
mate, dont worry about it, yours isnt looking that bad.

ok so its a fair amount of work but:

its a huge relief when its all done

yours doesnt need that much work

its so much easier when the car is fully stripped.

and luckily it doesnt look anything like this:

8a1e5ec1.jpg


as you can see there is a general lack of crossmember, various deficiencies in wheel arch and a serious case of repeat boot floor AIDS.

BUT it wasnt long before this

62c2e00d.jpg


then a test fit like this

230fdd2e.jpg


then some panels like this

39d6f1f2.jpg


then some paint like this

2c65417c.jpg


a new floor like this

f762553b.jpg


and a very happy moment like this

DSC_0002-1.jpg


go forth and weld! :D
 
Mr Noisy,

I have a picture of yours on my phone as inspiration, however from your previous posts I had no idea you did so much.

I must admit there is a strange perversness / perversity (whatever) in stripping stuff out.

I had considered an ali floor bolted/rivited in as it isn't structural.

I particularly like your wheel and suspension set up which I will be mimicking from you in the nicest form of plagurism
 
checking your new pics, i have already done front end a while ago on mine. if i had been able to buy the YRM metal solutions front end reapir panels at the time it would have made my job a HELL of a lot quicker/easier. check out their site and see what you need.

ok its dearer than making your own but how much do yoiu value your time and how nice do you want the result to be?

with the YRM stuff you can do a 'back to new' resto as opposed to a repair with home cut sheet. i used the latter and its fine but you should check it out just in case.

also check this link for some more inspiration:

https://picasaweb.google.com/117840...authkey=Gv1sRgCLeUoKqc0rD3nwE&feat=directlink

cheers
 
Mr Noisy I do like your rear bumper - Who does it?

I do plan on using YRM and can't wait to get cracking. Unfortunately it is all to be done outside as my garage is already full and not big enough.
 
hi mate

the rear bumper was custom made. i know a lad in wigan who does bumpers and sliders as a sideline. he does a fabulous job and comes up with some very novel ideas.

will pm his info.

outside is a bit of a bummer esp with winter coming.

will the car not fit in the garage if the garage was emptied? it will be a major help to have it inside, then you can leave it as is and come back to it next day no worries.

cheers :)
 
Never look at it as a whole picture. Just keep picking off one job at a time and you will get satisfaction from all the little jobs. Trouble is winter is a coming So get the finger out........:D
 
mustadmit im enjoying your picture taking, light hearted attitude and general banter so far.

this project is gonna be a good'un to follow.

strangely, i kinda miss welding mine, was fun making it new again.

since it was all done and fixed up, every time i use it now it is becoming less new again :(

ANYWAY! good luck with it mate! :D
 
Thanks for the PM Noisy, I will keep that number safe.

The links that have been suggested are great and they prove you can save almost any Discovery if you like hard work and take your time.

I would dearly like mine in the garage but my bikes (BMW and Harley) are more valuable although the Harley is currently in the garden under a cover. (Not that I ride it anyway so it may go to fund the Disco conversion/upgrade).

The next job this week is to pressure wash the whole thing and then start cutting out the rust a bit at a time.

I am looking forward to posting more picks as I go although forgive me as I haven't included photos before.

Finally please feel free to heap encouragement!!! Not only am I doing this but I'm fat, unfit and training for a half marathon in March (currently 2miles takes 13 mins and a near heart attack) plus I have 4 kids all of which are hitting 'that age' respectively.

Christ I need a workshop away from home.........................
 
the rear bumper was custom made. i know a lad in wigan who does bumpers and sliders as a sideline. he does a fabulous job and comes up with some very novel ideas.

will pm his info.

Hi, sorry to hijack slightly, but could you pm his details to me also, as looking for sliders and I like that rear bumper ;)

Cheers
 
Mr Noisy..is that boot floor just replaced with one sheet of check-plate? Got to do mine soon, and although not expensive for the fllor (£60) I reckon your solution would be far better..
 
Back
Top