Sam's 1967 Series 2 project.

This site contains affiliate links for which LandyZone may be compensated if you make a purchase.
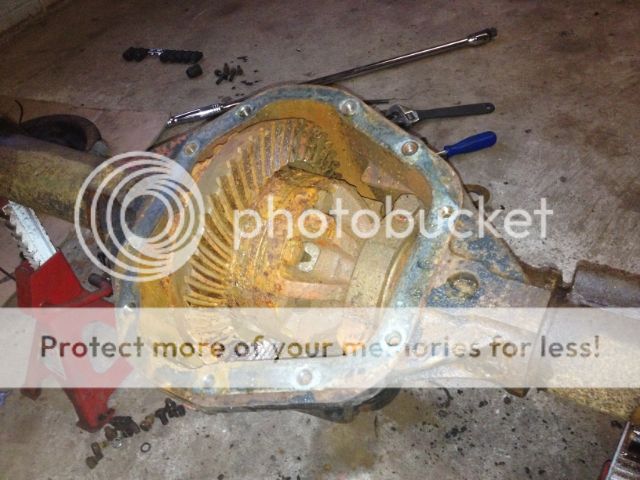
went and picked up my axles yesterday, front ex mod casing and diff and a complete salisbury for the rear minus brake drums.

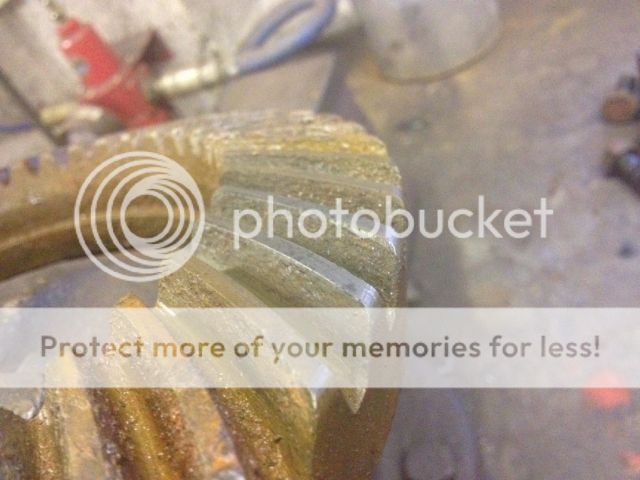
pressure washed the mud and old underseal off it and opened the drain plug for about 2 litres of water to come out :eek: yeah my worse fears where confirmed its totalled :(


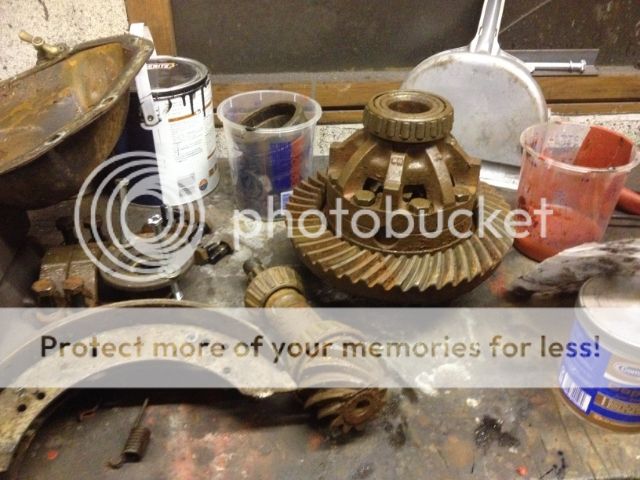
so anyways its back to the old rover axle took the spare diff out of the front axle and put it into the rear on with the backplates, stub axles and brake shoes ill get the hubs built up and fitted during the week.

got two coats of black onto the parts i painted in the week.

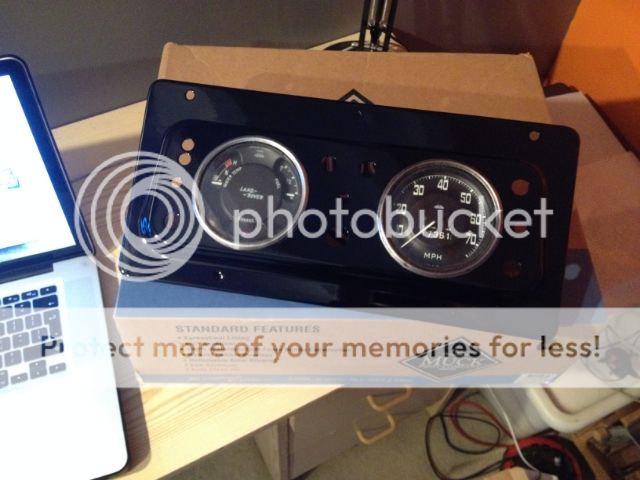
and started to build up the dash,

 
Well had a long day today, started off by stripping down and cleaning the front axle parts, welding on the new front diff pan then reinstalling the diff and painting


then whilst the paint dried ran the battery cables then fitted the floor panels.


an overall shot of how its looks now the back axle is done and back under just needs the new drums and drive members fitting.


hopefully some more progress tomorrow

Sam
 
another update no pictures unfortunately but got the front axle reassembled and refitted just got the free wheeling hubs to clean and refit. fitted the new procomp shocks and the extended brake hoses. cut the footwell to accommodate the newly acquired brake servo assembly and the bulkhead tie rod bracket off to clear the clutch master cylinder, fitted the defender accelerator pedal.

hopefully get some pictures after work tomorrow :tea:
 
well got to love a 4 day weekend, made up all the brake pipes and got them bleed seems to work nicely just got to get the engine up and running to check the servo,


brake pipes not in that pic but thats were the wing had to be cut to fit around the servo.


most the pipework sorted just got to sort the intercooler pipes out getting the silicon elbows when i order the exhaust bits, couldn't get the 300 expansion tank to sit right so dug out the old 2.5td one from the 90 and seems to fit nicely to the wing. Started to make a frame to hold the washer bottle but ran out of welding gas so thats on hold till next weekend.

most the wiring is sorted just needs the lights fitting and connecting obviously once its reassembled after painting, couldn't find an definitive answer regarding water temp sender/gauge compatability so fitting a separate one and matching boost gauge (sorry couldn't resist) and the three switches are horn, washer and override for the engine fan.


and in less than a year its on its third roof, finally sourced a canvas and frame at a good price nice condition just needs some new rope and a waterproof treatment seems very dry.


bit the bullet in the end and brought an exmoor bar and belts,


happy how its going so started stripping it down ready for paint,


got a few final issues like the damn engine won't start now, getting fuel to the filter through to the injection pump and back to the tank but doesn't seem to be going to the injectors :confused:

i used the ezi bleed to do the brakes but for the clutch it won't seal on the reservoir so got to go old school and get someone to pump the pedal.

then the fan thermostat and its just reassembly :rolleyes:

anyway thats this weekends progress :tea:
 
done a little today, started off with finishing the mount for the washer bottle trouble sourcing gas for the mig so ended up using the arc,


once that had cooled i gave it a coat of paint whilst drying started on a few other bits, after fitting the new sides too the seatbox there was a gap once the lid was on over the battery so cut some chequer plate and riveted it on and drilled the holes to bolt the seat onto.


then cut a full size one to cover the tank cutout.


whilst it was out i made a shield for the inner wing seems to have helped make it more rigid as well so alls good.


got the engine running in the week so :D but whilst trying to bleed the clutch i managed to short out the horn wiring and set fire to the loom so had to strip off the insulation to replace the wire which took a while.
then this evening i attempted to waterproof the canvas.


more tomorrow hopefully :tea:
 
unfortunately today didn't go as well, started by testing the canvas seems nice and waterproof (for now anyway) then ripped out all the rope and replaced it with paracord (the rope was beginning to rot) and looked into fitting bungee but read somewhere on here paracord was recommended that all went well.

but tried bleeding the clutch and after attempting to back bleed it, it seemed there was a blockage in the slave somewhere. But eventually that started flowing got all the air out but still pedal travel is crap only about two inches at the bottom and takes some pumping to get that, it drives but obviously not how it should be so ordered a new clutch slave cylinder as its the only part in the system yet to be replaced. so all being well that will arrive before next weekend and i can crack on and get it fitted :rolleyes:
 
its looking good mate loving the rag top :D

cheers buddy yeah I'm happy with how its going :D

got a bit more done this evening, stripped down the tailgate and paint sanded off along with the door tops sanded


then i sprayed some zinc paint onto the tailgate capping and hinges/catches plan is to use this paint on all the cappings ;)


Right then another long weekend.
had some deliveries in the week, silicon hoses so i could finish off the intercooler piping,


Clipped on and covered in dust :eek:


also got the exhaust components so could plan that out, struggling for routes but decided on something to try :D needed to mod the wing bracket for clearance so welded on a piece of angle for some extra support


then moved onto finishing off the sanding/body work :violin: (hate it)
struggling to removed the paint from the tub, seemed to be bitumen type stuff but some celly thinners i had spare seemed to shift it quite nicely if not a little smelly.


all being well i will be commencing painting next weekend :)


:tea: Sam
 
got the bulk of the painting done this weekend,


everything is painted now bar the vents, filler cap and load area. not the best of jobs plenty of runs on almost every panel but at least its all one colour now, any touch ups will be done when the weather gets a little warmer

Sam :tea:
 
cheers chaps yes its certainly bright, it was sold as aircraft blue saw one of those land rover paint charts that listed it as a land rover colour but I've certainly never seen one that bright. its defiantly not going to get lost in carparks thats for sure :p

:p Neither will mine,
Looks a similar sort of colour actually. Yours is probably a bit brighter

What paint are you using. 2k or celly ?

I buy my paint of ebay and a lot of the time I think they just generalize so the they get more hits on there listing.
 
Last edited:
:p Neither will mine,
Looks a similar sort of colour actually. Yours is probably a bit brighter

What paint are you using. 2k or celly ?

I buy my paint of ebay and a lot of the time I think they just generalize so the they get more hits on there listing.

haha trying not to go to landowner ish and paint everything blue ;)

thats why i asked on your thread what blue it was you were using cuz i was after a picture of aircraft blue but took the chance and after finding a tiny (terrible quality) sample pic on ebay i took the plunge and ordered it its jawed 2k still uncertain whether to give it a polish or leave it as is defiantly got more of a shine than the celly i used for the 90

Haha yeah landowner must have had gallons of blue paint :behindsofa:
I find that problem and I ended up doing the same and took the plunge. Glad I did now though :)

First time you've used 2k?
How'd you find it?
For me it's a far superior paint. I used celly for my first respray and I doubt I would go back to it now.

2k should come out of the gun fine and not need a polish unless you have blemishes you want rid of? That said it will come up even better with a polish. Don't know weather to do mine or not yet. Got some overspray on it so if it doesn't wash of which I'm doubtful it will I'll have to do something.

well my mate helped me spray my mini he did that with 2 pack but after reading all the safety warnings i decided against it for the 90 but the benefits outweighed the negatives so the series has been 2 pack, yeah there are plenty of defects runs, blotches and a few patches were some dust dropped down but it was never going to be a show winner just a bit of a summer toy/plaything so not too fussed .
 
well my mate helped me spray my mini he did that with 2 pack but after reading all the safety warnings i decided against it for the 90 but the benefits outweighed the negatives so the series has been 2 pack, yeah there are plenty of defects runs, blotches and a few patches were some dust dropped down but it was never going to be a show winner just a bit of a summer toy/plaything so not too fussed .

Your always going to end up with defects painting in a garage. I can spend ages cleaning it out and it still ends up with dust particles in the paint. Although I've started to wet the floor and that helps a lot.

End of the day it's a landrover and as you say a toy. And it's better than paying someone to do it :D

If you want mint just flat it back, polish it and it'll look great.
 
got a little more done this evening after work,

decided to try some truck load bed type coating instead of just paint in the back its got grains of rubber inbuilt meant to make it hard wearing and slip resistant.

before,


after,


also made sense in my eyes to do the floor panels with it,


whilst that was drying i refitted and sealed the shark tooth rail to the top of the screen,


then made a start on reassembling the tailgate but paint is still quite soft so didn't really tighten anything fully,


Sam:)
 
Back
Top