dominicbeesley
Well-Known Member
- Posts
- 1,701
- Location
- Hebden Bridge, West Yorkshire
I know the feeling, I've nicked a few parts off this one for the daily drive '88.
D
D
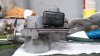
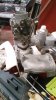
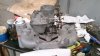
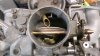
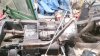
cant picture it exactly, but I have a few carbs kicking around.Bugger, I've just been rebuilding my carb as it was filthy (and had been painted) and have managed to round off the little accelerator pump jet. This is the one that sticks out about 1/4" into the choke of the emulsion block. Does anyone know what thread these are to try and clean it out....
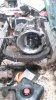
I'd like to keep this carb because apart from the muck its in good nick. If not does anyone have an emulsion block or otherwise knackered carb for sale?
Cheers
D
")
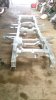
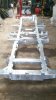
Well I bit the bullet and bought a new chassis, it arrived all shiny in the sun from Richards on Friday. I've now got a few weeks off work so will be blitzing this (as well as trying to get the other Landy through its MOT).
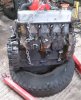
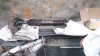
Yesterday I rebuilt the front prop ujs and removed the engine. This aft I'm going to start rebuilding the front axle...
I've put some pics on the post above - hit save before I was ready.
Have you painted you chassis or left it as plain galv?
I think I'm going to leave mine as it comes for now...
Not sure whether to paint it or not, I really want to start spannering it back together now....Just spent three hours stripping and painting battery tray and bulkhead/steering mounts.
Did you not use any "mordant" stuff? I can't work out how much I'd need...
Welcome To LandyZone, the Land Rover Forums!
Here at LandyZone we have plenty of very knowledgable members so if you have any questions about your Land Rover or just want to connect with other Landy owners, you're in the right place.
Registering is free and easy just click here, we hope to see you on the forums soon!