- Posts
- 83,310
- Location
- Embasinga stocæ
Fit a PRRT
Contents
Parts Required and Suppliers
Using Land-Rover Kit (PCH001190):
2 off 32mm diameter x 50mm length alloy hose joiners (£5.00 each) - Midland Performance Centre
1 off 32mm diameter x 100mm length alloy hose joiners (£6.00) - Midland Performance Centre
Using MG-Rover Kit (PCH003320):
1 off 32mm diameter x 50mm length alloy hose joiners (£5.00 each) - Midland Performance Centre
or cut a piece from the aluminium tube discarded from the original system
How To Fit
With thanks to SELOC Member Elise_S1
The following page explains how I fitted the kit PCH001190 designed for the Land Rover Freelander to my Lotus Elise S1. Although I tried to use a setup which is as close as possible to the one used by Rover for the late MG-TF, this is NOT an official upgrade and, if you decide to copy it, I accept no liability for any possible consequences.
As my car is a standard late S1, the guide is for a similar car. Although the setup is compatible with all the K powered Elises and derivatives, some models may need some corrections because of their different cooling circuits. Early Elise S1, all cars with air conditioning and cars with aftermarket oil/water heat exchanger do need a slightly different setup.
To install the remote thermostat the following parts are required:
[*]1 Land Rover Freelander Thermostat Kit part PCH001190[/LIST]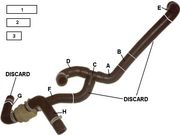

Click to Enlarge
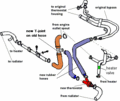
First thing to do is take apart the PCH001190 and getting familiar with all its components. You will have 5 rubber hoses and 10 clips.
IMPORTANT!!
The clips should be used as follows: the 3 black ones must go on the T junction; the 2 larger grey are for the thermostat housing (bottom and side hoses); 1 medium sized grey clip is for the thermostat top hose and the remaining 4 small grey are for the other junctions.
Then you need the interconnections: with the aluminium pipe you need to make part 1 (90 mm long), part 2 (60 mm long) and part 3 (45 mm long). I actually fitted a plug to junction 1 to achieve a tidier coolant draining, but this require some TIG welding and is not necessary.
Following the Service Manual instructions, drain the coolant circuit, then remove the return pipe and the short rubber hose connected to the engine main coolant rail (1 clip at the bottom + 1 clip at the top). You remove also the outlet hose (1 clip at the engine outlet spout + 1 clip at the bottom pipe, you need to loosen the pipe mount to remove the hose). Once removed the return pipe you can undo the coolant rail: 2 (tight) bolts below the rail and the oil dipstick bolt holding the thermostat housing. I did this without the manifold in place and it was simple, but I seriously doubt it is that easy with the manifold on.... once loosened the coolant rail you can remove the thermostat housing. You open it (3 bolts) and replace the old thermostat with the ring PEL000040. I enlarged the bypass duct inside the housing from 12 to14.5 mm to improve the heater flow. All 3 gaskets should be replaced, to minimize the risk of leaks. Apply silicone lubricant on the O-rings, then fit housing + coolant rail back in.
This part is the most important of all: cutting the Kit hoses to make it fit. I prefer not to give measures about where you should cut the hoses because, on another car, the lengths required could be slightly different. you can take the photos as a guideline, but BE CAREFUL as, once you cut a hose too short, you are into trouble. My advice is to leave 2 cm extra hose as a safety margin, use no clips and then cut again where needed after having tried to make it fit. To achieve a clean rubber cut, you can insert the remaining of the aluminium tube where you need to do the cut. Hoses H and D need no cutting.
[*]Once reassembled, the PCH001190 kit should look like this:[/LIST]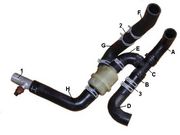
Click to Enlarge
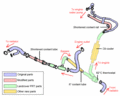
[*]Here below is the kit and the two parts it is going to replace:[/LIST]
Click to Enlarge
The original jubilee clips can be used to secure the new setup to the car, leaving the remaining clip (originally there were 2 on the top return hose) to secure hose H to pipe 1.
If a drain take off is present, all clips could be tightened, otherwise leave the bottom pipe disconnected to allow system flushing. Personally, I recommend a good and repeated flush of the whole coolant system with clean water, especially if a different type of coolant is going to be used. Refill the circuit with coolant, check all the junctions for leaks and bleed the system as on the Service Manual.
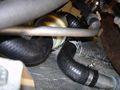
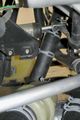
Below there are some photos of the PRRT fitted URL="http://wiki.seloc.org/a/Image:ThermoF.jpg"]
 [/URL]
Click to Enlarge

Click to Enlarge
Click to Enlarge

Click to Enlarge
There are several ways to set up your cooling system

Contents
Parts Required and Suppliers
Using Land-Rover Kit (PCH001190):
2 off 32mm diameter x 50mm length alloy hose joiners (£5.00 each) - Midland Performance Centre
1 off 32mm diameter x 100mm length alloy hose joiners (£6.00) - Midland Performance Centre
Using MG-Rover Kit (PCH003320):
1 off 32mm diameter x 50mm length alloy hose joiners (£5.00 each) - Midland Performance Centre
or cut a piece from the aluminium tube discarded from the original system
How To Fit
With thanks to SELOC Member Elise_S1
The following page explains how I fitted the kit PCH001190 designed for the Land Rover Freelander to my Lotus Elise S1. Although I tried to use a setup which is as close as possible to the one used by Rover for the late MG-TF, this is NOT an official upgrade and, if you decide to copy it, I accept no liability for any possible consequences.
As my car is a standard late S1, the guide is for a similar car. Although the setup is compatible with all the K powered Elises and derivatives, some models may need some corrections because of their different cooling circuits. Early Elise S1, all cars with air conditioning and cars with aftermarket oil/water heat exchanger do need a slightly different setup.
To install the remote thermostat the following parts are required:
[*]1 Land Rover Freelander Thermostat Kit part PCH001190[/LIST]
- 1 Spacer to use instead of the old thermostat part PEL000040
- 3 Thermostat housing gaskets (2 O-rings + 1 inner gasket)
- 40 cm aluminium pipe, OD 32 mm ID 28 mm
- 8 lt of coolant fluid (I used a red OAT product, as recommended by the manifacturer)

Click to Enlarge
First thing to do is take apart the PCH001190 and getting familiar with all its components. You will have 5 rubber hoses and 10 clips.
IMPORTANT!!
The clips should be used as follows: the 3 black ones must go on the T junction; the 2 larger grey are for the thermostat housing (bottom and side hoses); 1 medium sized grey clip is for the thermostat top hose and the remaining 4 small grey are for the other junctions.
Then you need the interconnections: with the aluminium pipe you need to make part 1 (90 mm long), part 2 (60 mm long) and part 3 (45 mm long). I actually fitted a plug to junction 1 to achieve a tidier coolant draining, but this require some TIG welding and is not necessary.
Following the Service Manual instructions, drain the coolant circuit, then remove the return pipe and the short rubber hose connected to the engine main coolant rail (1 clip at the bottom + 1 clip at the top). You remove also the outlet hose (1 clip at the engine outlet spout + 1 clip at the bottom pipe, you need to loosen the pipe mount to remove the hose). Once removed the return pipe you can undo the coolant rail: 2 (tight) bolts below the rail and the oil dipstick bolt holding the thermostat housing. I did this without the manifold in place and it was simple, but I seriously doubt it is that easy with the manifold on.... once loosened the coolant rail you can remove the thermostat housing. You open it (3 bolts) and replace the old thermostat with the ring PEL000040. I enlarged the bypass duct inside the housing from 12 to14.5 mm to improve the heater flow. All 3 gaskets should be replaced, to minimize the risk of leaks. Apply silicone lubricant on the O-rings, then fit housing + coolant rail back in.
This part is the most important of all: cutting the Kit hoses to make it fit. I prefer not to give measures about where you should cut the hoses because, on another car, the lengths required could be slightly different. you can take the photos as a guideline, but BE CAREFUL as, once you cut a hose too short, you are into trouble. My advice is to leave 2 cm extra hose as a safety margin, use no clips and then cut again where needed after having tried to make it fit. To achieve a clean rubber cut, you can insert the remaining of the aluminium tube where you need to do the cut. Hoses H and D need no cutting.
[*]Once reassembled, the PCH001190 kit should look like this:[/LIST]

Click to Enlarge
[*]Here below is the kit and the two parts it is going to replace:[/LIST]

Click to Enlarge
The original jubilee clips can be used to secure the new setup to the car, leaving the remaining clip (originally there were 2 on the top return hose) to secure hose H to pipe 1.
If a drain take off is present, all clips could be tightened, otherwise leave the bottom pipe disconnected to allow system flushing. Personally, I recommend a good and repeated flush of the whole coolant system with clean water, especially if a different type of coolant is going to be used. Refill the circuit with coolant, check all the junctions for leaks and bleed the system as on the Service Manual.
Below there are some photos of the PRRT fitted URL="http://wiki.seloc.org/a/Image:ThermoF.jpg"]
Click to Enlarge

Click to Enlarge

Click to Enlarge

Click to Enlarge
There are several ways to set up your cooling system


