This is what I manged to do a while ago when I needed to replace my In-tank fuel pump on my P38 Diesel.
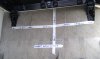
I have attached pictures ( phone camera ) which show the EXACT dimensions which you can follow if you need to replace your pump without dropping the fuel tank.
I did make many measurements before I decided to make any cuts. I think this the optimal amount of cutting required without loosing structural strength, minimising noise and having adequate access.
My datum points are the centres of the bolts which hold down the rear 60% seat.
Tools I used were :
Dremel with a thin steel cutting disc. ( You could use a diamond disc )
Sharp knife ( I used a scalpel)
Stanley knife
Steel ruler
Tape Measure
Permanent marker
Paint Brush
Vacuum Cleaner
Hammer
Pump pliers
Bucket
Rags
Flat bladed screwdriver ( big one )
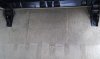
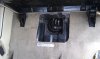
Cut the carpet away as shown ( I used a scalpel), try and be accurate as possible here, use a steel ruler to guide you as the metal hatch template is based on this cut.
You can then fold this carpet under the seat ( just move the seat back a little)
Next cut the foam sound proofing- I used a scalpel for this too. I cut it at an angle so it tucked itself under the foam next to it when i replaced it.
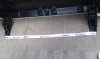
Next mark out the cut lines according to the photos.
After carefully marking out the cut lines, you will notice that the cutting surface has some Black tar substance applied ( which is sprayed over with the same colour as your car)
You will need to use a stanley knife and cut about 2 mm either side of your cut line, ( again I used a small metal ruler as a guide) then using a thin bladed screwdriver or very narrow chisel to chip this material away. You have to do this otherwise your steel cutting disc will get clogged.
After you have brushed away all the debris you can start to cut. ( use some safety goggles and a mask)
You can gauge how deep you are going by seeing how far the cutting disc is cutting through- the metal is only about 1mm - 1.5mm max
When cutting I made the first cut on the left hand side against the seat. There is a stiff bit of plastic here you will need to cut that up the seat aswell. ( I used a long bit of wood which i pushed up against the plastic and used my knee to hold it there whilst cutting.
Your Dremel will get hot, so take a break after 10 -15 mins, let it cool down and start again.
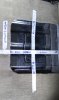
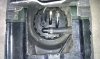
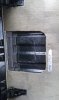
You should then be able to get your screwdriver under flap and prise it up.
Get a small paintbrush and brush the top of the tank and the recess to dislodge the years of rubbish and dust. Then get your vacuum to suck all the dust up ( you must have this area super clean- you dont anything dropping into tank especially metal dust! Do it a couple of times if you have to.
Next disconnect the multiplug, and remove the big breather pipe ( I manged to unclip and reuse the old securing clip- I used pump pliers.
Undo the 2 nuts using 2 spanners. You will probably have a lot of corrosion on these- i soaked them with WD40 and tapped them for about 10 mins- this will test your patience. The fuel lines are made of plastic and can be kinked so hold one nut steady- fuelside and turn the big nut to undo. I just slakened them off.
Next big screwdriver and a few gentle taps on the big retainer ring and unscrew by hand.
Make sure you have spare olives for the new pump- you cant reuse the old ones.
Undo all the connections.
Make sure you mark the flow and return.
You can plug the ends of the lines if you wish.
Pull out old pump.
Replace with new pump- insert pump the same way( orientation) as you Removed the old one.
Reconnect everything back.
Start engine and check for leaks
You can fold back the metal flap and put the foam back and run it for a few days and go back and check again for leaks.
I have to source some metal plates which I will rivet to the flap and use self tappers to secure . Then a bit of duct tape to cover it all up.
thats it.
Hope this helps.
I have attached pictures ( phone camera ) which show the EXACT dimensions which you can follow if you need to replace your pump without dropping the fuel tank.
I did make many measurements before I decided to make any cuts. I think this the optimal amount of cutting required without loosing structural strength, minimising noise and having adequate access.
My datum points are the centres of the bolts which hold down the rear 60% seat.
Tools I used were :
Dremel with a thin steel cutting disc. ( You could use a diamond disc )
Sharp knife ( I used a scalpel)
Stanley knife
Steel ruler
Tape Measure
Permanent marker
Paint Brush
Vacuum Cleaner
Hammer
Pump pliers
Bucket
Rags
Flat bladed screwdriver ( big one )
Cut the carpet away as shown ( I used a scalpel), try and be accurate as possible here, use a steel ruler to guide you as the metal hatch template is based on this cut.
You can then fold this carpet under the seat ( just move the seat back a little)
Next cut the foam sound proofing- I used a scalpel for this too. I cut it at an angle so it tucked itself under the foam next to it when i replaced it.
Next mark out the cut lines according to the photos.
After carefully marking out the cut lines, you will notice that the cutting surface has some Black tar substance applied ( which is sprayed over with the same colour as your car)
You will need to use a stanley knife and cut about 2 mm either side of your cut line, ( again I used a small metal ruler as a guide) then using a thin bladed screwdriver or very narrow chisel to chip this material away. You have to do this otherwise your steel cutting disc will get clogged.
After you have brushed away all the debris you can start to cut. ( use some safety goggles and a mask)
You can gauge how deep you are going by seeing how far the cutting disc is cutting through- the metal is only about 1mm - 1.5mm max
When cutting I made the first cut on the left hand side against the seat. There is a stiff bit of plastic here you will need to cut that up the seat aswell. ( I used a long bit of wood which i pushed up against the plastic and used my knee to hold it there whilst cutting.
Your Dremel will get hot, so take a break after 10 -15 mins, let it cool down and start again.
You should then be able to get your screwdriver under flap and prise it up.
Get a small paintbrush and brush the top of the tank and the recess to dislodge the years of rubbish and dust. Then get your vacuum to suck all the dust up ( you must have this area super clean- you dont anything dropping into tank especially metal dust! Do it a couple of times if you have to.
Next disconnect the multiplug, and remove the big breather pipe ( I manged to unclip and reuse the old securing clip- I used pump pliers.
Undo the 2 nuts using 2 spanners. You will probably have a lot of corrosion on these- i soaked them with WD40 and tapped them for about 10 mins- this will test your patience. The fuel lines are made of plastic and can be kinked so hold one nut steady- fuelside and turn the big nut to undo. I just slakened them off.
Next big screwdriver and a few gentle taps on the big retainer ring and unscrew by hand.
Make sure you have spare olives for the new pump- you cant reuse the old ones.
Undo all the connections.
Make sure you mark the flow and return.
You can plug the ends of the lines if you wish.
Pull out old pump.
Replace with new pump- insert pump the same way( orientation) as you Removed the old one.
Reconnect everything back.
Start engine and check for leaks
You can fold back the metal flap and put the foam back and run it for a few days and go back and check again for leaks.
I have to source some metal plates which I will rivet to the flap and use self tappers to secure . Then a bit of duct tape to cover it all up.
thats it.
Hope this helps.
")