You are using an out of date browser. It may not display this or other websites correctly.
You should upgrade or use an alternative browser.
You should upgrade or use an alternative browser.
Try again….
- Thread starter resto_d1
- Start date
This site contains affiliate links for which LandyZone may be compensated if you make a purchase.
Morning all, I appreciate all your help and advice in both this and the other v8 thread. I was talking to the chap selling me the v8 (he’s a mate) and we both actually came to the decision that the d1 should remain 300tdi for a few points!
I’m going for what the cool kids used to call OEM+. I.e. the vehicle should remain as original as possible and a heart transplant alters this
Going away from original will likely de value
Causes an insurance pain
Causes a big expense - my bottom end on the 300 looks decent - I’ll just stick a turners head on,
300tdi keeps it tough and no nonsense. Yes it’s seeming like I’m building a cabinet queen but in reality it should get used for shoot days and enjoyed
Biggest factor is project duration - the tdi loom is all tidied up, I have pics of it all and what I can’t do or remember you guys will be able to tell me
Chassis remains original too.
My plan is to get an old 750 or similar one day for my next project so perhaps I will have a v8 one day some day
Drivers side just needs a clean I reckon…..
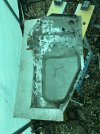
All the rust sponge was wet again. Wing has been patched a couple times and started to lose its shape a bit! One of the Yrm panels in the kit marries up with the headlight box joint and a horizontal line so it gives you the perfect base to line up off. Should’ve done the other side like this but never mind
All the rust sponge was wet again. Wing has been patched a couple times and started to lose its shape a bit! One of the Yrm panels in the kit marries up with the headlight box joint and a horizontal line so it gives you the perfect base to line up off. Should’ve done the other side like this but never mind
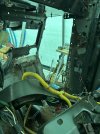
Bit annoying. I’ve got to take the heater box out and the rest of the interior. The dash etc is the only bit I actually worry about putting back together!
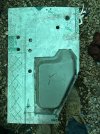
I chased the rust back to my repair on the other side. Needs a bit of fresh metal.


I chased the rust back to my repair on the other side. Needs a bit of fresh metal.
A week of broken or faulty gauges.
Forgot to take pics as I went but I’ve flatted back one door and one wing. This involved taking back several areas to bare metal due to corrosion.
First faulty gauge - gun gauge wouldn’t read and my spare wasn’t very useful. Sprayed the quartz zinc epoxy by ear pretty much with a 2.0 tip. Both panels need filler, blocking back again then another dose of epoxy.


Next up was drivers side bulkhead/inner wing. Bit of a fcuker this one but might aswell do a thorough job!! Second gauge died when I knocked over my gas running from a hornet. No welding until new one comes!!!

Forgot to take pics as I went but I’ve flatted back one door and one wing. This involved taking back several areas to bare metal due to corrosion.
First faulty gauge - gun gauge wouldn’t read and my spare wasn’t very useful. Sprayed the quartz zinc epoxy by ear pretty much with a 2.0 tip. Both panels need filler, blocking back again then another dose of epoxy.
Next up was drivers side bulkhead/inner wing. Bit of a fcuker this one but might aswell do a thorough job!! Second gauge died when I knocked over my gas running from a hornet. No welding until new one comes!!!
Attachments
Hicap phill
Well-Known Member
- Posts
- 15,458
- Location
- Wiltshire
And did you get any pictures of the hornet ?
Nope - it was swearing at me in mandarin. Size of a recreational aircraft that thing!And did you get any pictures of the hornet ?
I’ve never taken an inner wing back that far. I had to remove the welds on the bulkhead bar and slide the panel I’m remaking out. Took a lot of jimmying but I’m glad I did it that way. I’m a lot more patient and systematic now than I was few years ago. I’ve also picked my colour (testers in Matt but I’ll be going gloss). Aim was to make it look like the front of the Haynes manual as that looks perfect to me. Think Haynes manual is slightly different shades depending on the sun. This is the colour I’m chasing. Pretty close with a RAL night blue which nisocoat 2 comes in 

